How To Put The Clips Back On A Clip Frame
How to put the clips back on a clip frame - The art of embroidery began thousands of years in the past. Early examples will be found everywhere in the world. There may be ancient embroidery from Egypt, Northern Europe and China. The place and the way it actually started will remain a mystery. What we do know is that in Europe, embroidery was a status image. Using a needle and thread in order to sew patterns on fabric was an indication of wealth and prosperity. It was thought-about a woman's work. Many royal and noble women spent hours embroidering. They embroidered everything, from tapestries to coats. These rich and highly effective ladies were usually depicted in portraits with their embroidery frame or other instruments used for the craft. Many other cultures share Europe's use of embroidery as marking wealth and status. Persia, India, Japan and China even have richly embroidered materials. These had been celebrated cloth and those who made them were artisans of excessive caliber.
There are two primary ways to avoid wasting a stabilizer. The primary is thru pre-planning, hooping your stabilizer slightly differently than normal, and the second is using leftover scraps of stabilizer after it has been used for embroidery. How you chop and hoop your stabilizer can lengthen the variety of embroideries you'll be able to stitch out, saving you money. When chopping your unique piece of both cut away or tear away to put in your hoop, reduce it the size you want in a single dimension, either length or width, however much longer within the other dimension. As an example, if you're reducing an 8-inch large piece for a 4x4 hoop, you may cut the stabilizer 8" x 24". Embroider the first design at one finish. After neatly chopping or tearing the stabilizer away from the finished design, re-hoop on the similar finish to your subsequent design, starting just previous the torn part. You might have to press the stabilizer utilizing a dry iron on low temperature in between hoopings whether it is wrinkled. Now you'll be able to reuse more of the stabilizer, presumably with the ability to sew out 4 (4) embroideries, depending on their dimension, from the one piece, as an alternative of the three (3) embroideries you'll get by reducing three items 8"x8". Take this idea to the acute, and do not minimize your length off at all. Hoop your stabilizer, leaving the roll connected towards the top of the hoop. Place the roll behind the machine, out of the way in which of the ring, embroidery arm, or any threads. After the embroidery is complete, tear the stabilizer away, press the wrinkles out, and hoop once more at the forefront.
Installing spring clips is simple. Use six metal Swiss Clips to hold the layers together.

Diy Hair Accessories Diy Hair Clip Holder How To Recycle A Picture Frame As A H Diy Hair Accessories Organizer Organizing Hair Accessories Diy Hair Accessories
Larger frames are shipped with extra clips that you can install at this time.

How to put the clips back on a clip frame. To use the Merge Clips command you simply. Do not drill through the frame or stretcher bar. Repeat for the other clips.
We sell a lot of frameless. Set your offset clips over the holes and screw them down. Mount a photograph or artwork on top of the backboard.
Assemble the frameless artwork by placing the piece of particle board on the bottom the photo and mat board in the middle and the glass or plexiglass on top. On each clip there is both a hook at the top that goes over the glass and a piece that clips into the slot on the back of the frame. Get it as soon as Wed Mar 3.
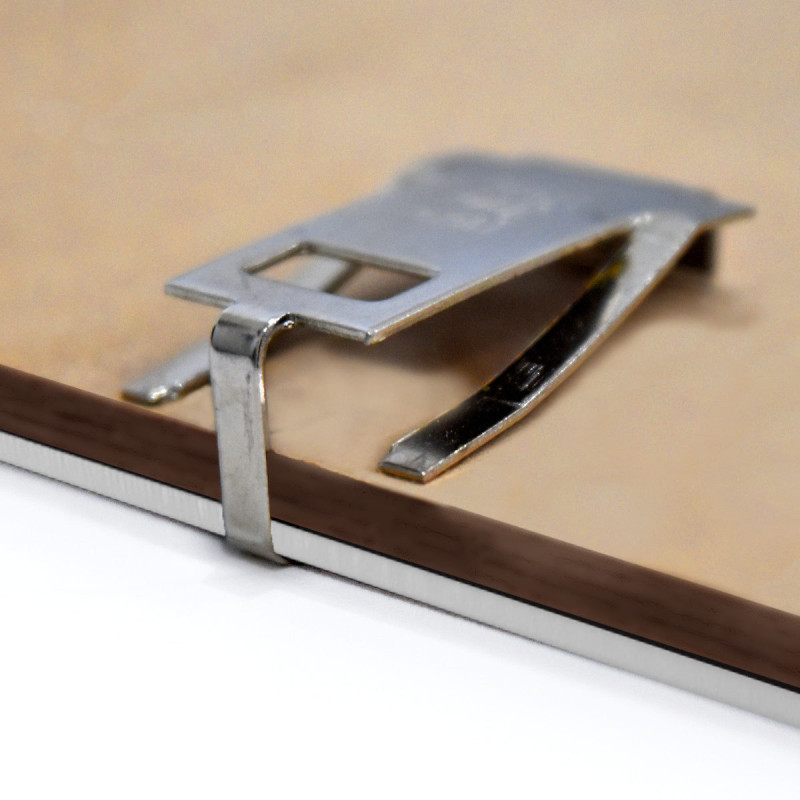
Press down on the center of the spring clip and slide it between the backing and the frame. You can do the same in the project panel by dragging and dropping the required clips on the timeline panel instead if you want to merge the clips on timeline. 8 rows A clip frame sandwich held together with Swiss Clips.
50PCS S-Shaped Photo Album Frame Metal Hanging Hooks Hanger Clips for Wall Mount Album Picture Photo Artwork Frames Black 39 out of 5 stars. Get it as soon as Wed Jun 9. TBWHL 3D Prtiner Glass Bed Clips Swiss Metal Small Picture Photo Frame Spring Turn Clip Hanger Silver Tone 1inchx055Inch26mmx14mm 100pcs.
Replace the spring clips on each side of the frame. Spring clips can be left out if the gap is 116 inch or less. We recommend putting one spring clip near each corner on the top and bottom of the frame and for larger frames placing additional clips in the middle.
If you have a small frame you likely received four clips and they can be placed in the middle of each frame bar. Using a utility knife carefully make slices into the wood between the marks. For larger paintings and frames I would put a clip on all four sides and screw the clip down to both the frame and stretcher.
If it is really large say over 40 inches I would use two clips on each side spacing them out towards the corners. Place two clips on each side of the frame each about two inches in from a corner. Make sure the artwork is centred and even.
You can also merge audio only clips using this method but not more than one video clip can be added. Press down on them lightly and slide them into the back of the frame in the space between the art materials and the back of the picture frame. Clip attachment- Position the clips where you want them on the frame and mark the hole positions.
Place the glass pane on top of the artwork and backboard. Hook the top over the glass then slide the bottom into place. Drill a small pilot hole at each mark on the frame and stretcher.
However the same command ie. It should push the contents toward the front. Insert the glazing mat and backboard back into the frame and reassemble the side that was removed.
Most offset clip packs come with short screws. At this point you can use a small chisel to make a small recess into the wood. FREE Shipping on orders over 25 shipped by Amazon.
Place the piece of wood against the mirror and mark the location of the clips with a pen or pencil. FREE Shipping on orders over 25 shipped by Amazon. Choose Clip Merge Clips The Merge Clips dialog box will open.
Assemble the frame by attaching the hook end of the clip to the top of the glass and insert the opposite end of the clip into the hole on the back of. Place a spring clip on its side with the top edge against the frame. Once all the clips are in place your artwork will be secure and tight against the front of the frame.
47 out of 5 stars. Select your required setting and click ok. 3 Screw the clips in place.
Open the clip by pressing the ends back toward the frame. If you have a larger frame you will have 6 - 8 clips.

You Me The Dogs Engraved Wood 4 X 6 Picture Photo Clip Etsy Clip Frame Engraved Photo Frames Wood Clips

Set Of Four 4 Rustic Wall Clip Frame Picture Display Etsy Wall Clips Clip Frame Minimalist Picture Frames
Diy Photo Art Christmas Card Or Mail Display Basically Display What You Want When You Want Just Stain A Wooden Board Photo Displays Crafts Kids Artwork

Canvas Clips And Offset Clips Ask Mike American Frame 1973

Set Of Four 4 Wall Clip Frame Minimalist Picture Frames Etsy Wall Clips Rustic Pictures Rustic Wall Decor
Perspex Clip Frames Frameshop Com Au

Make Do Photo Chain Diy Photo Chain Binder Clip Hacks Photo Chain

6 Opening Grid Board 16 X 24 Collage Frame With Clips By Studio Decor Studio Decor Collage Frames Diy Photo Frames

Rustic Wooden Family Collage Photo Frame With Clips Walmart Com In 2021 Pallet Picture Frames Rustic Picture Frames Diy Picture Frames

Repurposed Frame Diy Photo Frames Picture Frame Store Diy Photo Display

Small Picture Holder With Rustic Clip Picture Frame Note Holder Small Artwork Display Recipe Holder Small Diy Picture Frames Picture Holders Clip Picture Frame

Learn How To Properly Place And Space Spring Clips Into The Back Of Metal Picture Frames Metal Picture Frames Diy Picture Frames Frame

Metal Frames How To Place And Space Spring Clips Ask Mike American Frame 1973

Cadogan Metal Wire Clip Picture Frame Clip Picture Frame Frame Picture Frames
I might like to offer you some ideas for hooping satin jackets for machine embroidery. We do not need topping for satin jackets as a result of it's a secure material, unlike sport shirts and t-shirts that are knits and stretchy. Hooping satin jackets is among the trickiest little jobs for the new embroiderer to master. The design placement on the jacket again must be excellent - not too low or high - and it should be straight. For placement, one rule of thumb is to position the bottom of the lettering (if utilizing an arc, measure for the letter on the high of the arc) seven inches down from the collar seam. One other is to put the design's middle at approximately 9 or 10 inches down from the collar seam. (This is only a guideline. If it is advisable, get a sewout of the design or photocopy the actual dimension and lay it on the jacket to determine the perfect placement.) To get the design straight, lay the jacket flat and smooth, and utilizing clothespins, attach a yardstick beneath every sleeve where the seams come collectively. Draw a line with tailor's chalk or soap for the horizontal placement. Make a midway mark on this line to show the center. You'll want to double-check these measurements together with your eye - jacket making will not be an exact science and sometimes you must adjust a method or one other to make up for discrepancies in measurements.
Janome designed the Reminiscence Craft 9700 to bring collectively all the very best features into one sewing machine. The MC9700 has the ability and precision of a superior stitch mechanism mixed with the sophistication of computerized control. You get the precision stitching Janome is known for along with straightforward navigation and design format on a color contact display screen. The Memory craft 9700 can convert from a stitching machine into an embroidery machine in seconds. Unlike different brands that require separate attachments and quite a few steps the 9700 has a built-in, two-step conversion. Simply touch the embroidery mode key then attach the embroidery foot and one minute it's a stitching and quilting machine the subsequent an embroidery machine.
Deanne Blackhurst is a freelance writer for Dee's Crimson Works, an internet web site that makes a speciality of Redwork and Cross Stitch patterns. Using the traditional redwork model as inspiration, these new patterns are fairly priced and have a enjoyable vintage really feel but with a recent perspective. At Dee's Red Works yow will discover classic sets that characteristic the Days of the Week and charming Sun Bonnet Women in addition to the more current Cheese and Wine collection and Celtic Knots. They also carry thread and notions especially designed for redwork and cross stitch. Go to them at Dee's Pink Work Inc [http://www.dsredwork.com] and find a pattern you possibly can't resist.


Comments
Post a Comment